
Tags:Python (3)
Logging In Python Dynamo Node
Let's talk logging in dynamo.
Earlier, I realized earlier on that debugging is difficult if you aren't logging your output. Unlike ghPython in grasshopper, python in dynamo doesn't currently natively have a console to "print" to. So to handle this I have a log and clearLog() function I always tend to use. This writes to a text file path that you will see in the code.
Now you can call these two functions like so. Each log call, will print a single line of text
I then usually open it in a browser to easily refresh the value of the log.txt file. Boom, your own external console.

After debugging your scripts, you'll obviously want to disable logging features. To Disable the log, change the LOG_ACTIVE value to False. This will not write to any file when the log functions are called, without you having to delete or comment them out.
Earlier, I realized earlier on that debugging is difficult if you aren't logging your output. Unlike ghPython in grasshopper, python in dynamo doesn't currently natively have a console to "print" to. So to handle this I have a log and clearLog() function I always tend to use. This writes to a text file path that you will see in the code.
My Typical Log for dynamo
# <------------ LOG DYNAMO STUFF -------------------->#
import time,datetime

#<----- EDIT BELOW --->

#constants
LOGFILE =  "C:\Path\To\A\log.txt" #path to save text
LOG_ACTIVE = True #Setting to False will disable the log

# <---- END EDIT ---->

def log(textArr,is_raw=False):
    global LOGFILE,LOG_ACTIVE
    if LOG_ACTIVE:
        activeScript = ""
        #---- prefix to identify time and script running ---#
        ts = time.time()
        timestamp = datetime.datetime.fromtimestamp(ts).strftime('%Y-%m-%d %H:%M:%S')
        precursor ="[" timestamp "]  --> "
        #---- end prefix --->
        filename =  LOGFILE
        if not isinstance(textArr, (list, tuple)):
            textArr = [textArr]
        target = open(filename, 'a ')
        target.write("\n")
        target.write(precursor)
        for i in textArr:
            if (not is_raw):
                target.write(repr(i))
            else:
                target.write(i)
        target.close()

def clearLog():
    global LOGFILE,LOG_ACTIVE
    if LOG_ACTIVE:
        filename =  LOGFILE
        target = open(filename, 'w ')
        target.write("")
        target.close()

# <------------ LOG DYNAMO STUFF -------------------->#
Log Example
Now you can call these two functions like so. Each log call, will print a single line of text
 #clear the log. usually I run this at the beginning of my script.
 clearLog()
 #simple single values
 log("hello world")
 #multiple concatenated values via a list or tuple (will automatically give text version)
 foo = 5
 log(["hello the value of foo is: ",foo, "!!!"])
I then usually open it in a browser to easily refresh the value of the log.txt file. Boom, your own external console.
Disabling the Log
After debugging your scripts, you'll obviously want to disable logging features. To Disable the log, change the LOG_ACTIVE value to False. This will not write to any file when the log functions are called, without you having to delete or comment them out.
LOG_ACTIVE = False #Setting to False will disable the log
Renumber Views on a sheet
The pain of renumbering
In most offices, your documentation set will consist of a set of sheets, and each sheet has a titleblock with a zone for details/views/drawings/etc...whatever you want to call them, in revit there called views. Now these views generally have a corresponding number ascending from the bottom right to top left, for two reasons. Referencing from other drawings, but also the order is due to the binding normally being on the left hand side, and drawings should try to be as far away from the binding as possible (to keep the contractor happy).
The annoying part is that in revit, your view number on the sheet does not update magically when you move views around on your invisible cell grid. Furthermore, manually renumbering is sometimes a pain because you occassionally will get a nasty alert message from revit if you attempt to renumber with a duplicate number that already exists...
So I made a tool (revit python shell or dynamo player) to automatically renumber the views based on the location of the view on the sheet.
How it Works, 2 Essentials.
Move your details around, run the script, and wallah, your views are renumbered by the script analyzing the titleblock lower left point, and what cell it currently resides in! To do this we need two pieces of information.
1. Your cells are defined by a matrix. (2 dimensional array string) of numbers/text
.jpg)
Detail Grid
The detail grid is a 2 dimensional (list of lists) array. Visually, it should make sense no? This matrix is hardcoded into both the rps python script and dynamo player, which you can edit. But alternatively, this can be embedded into titleblock, which is explained later below.
#<---------detail grid format --------->#
# detail grid typical, with line breaks for clarity..

detailGrid = [
	["30" ,"25" ,"20" ,"15" ,"10","05"],
	["29" ,"24" ,"19" ,"14" ,"09","04"],
	["28" ,"23" ,"18" ,"13" ,"08" ,"03"],
	["27" ,"22" ,"17" ,"12" ,"07" ,"02"],
	["26" ,"21" ,"16" ,"11" ,"06" ,"01"]
]
#<---------detail grid can be anything, letters too :)  --------->#
# detail grid can be any text
# here we have letters

detailGridLetters = [
	["DD" ,"Y" ,"T" ,"O" ,"J","E"],
	["CC" ,"X" ,"S" ,"N" ,"I","D"],
	["BB" ,"W" ,"R" ,"M" ,"H" ,"C"],
	["AA" ,"V" ,"Q" ,"L" ,"G" ,"B"],
	["Z" ,"U" ,"P" ,"K" ,"F" ,"A"]
]
2. The bounds of the zone to subdivide with the aforementioned matrix. This generally represented as a line, top left corner to bottom right corner.
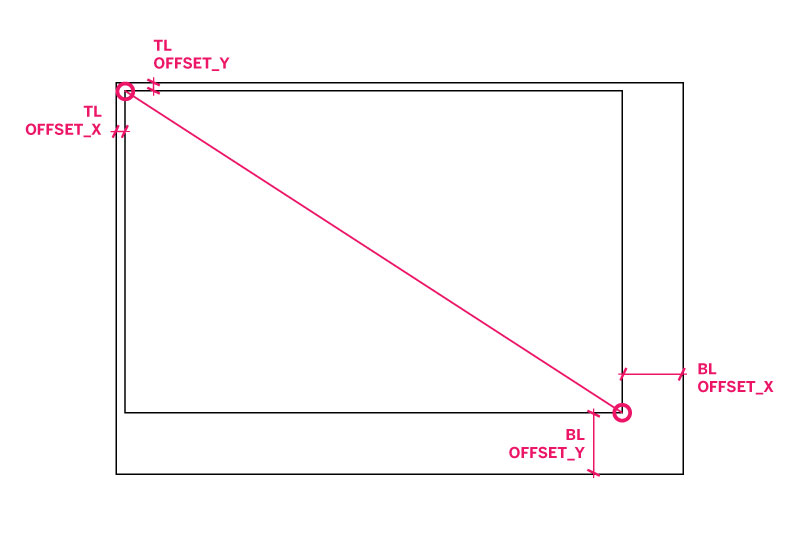
Bounds
The bounds are bascially 2 points (top left to bottom right).We define by defining these pts as offsets relative to the title block corners. Normally, the script will prompt you to select a representative detail line, but alternatively, this can be embedded into titleblock, which is explained later below.
# in pseudo code
# bounds = [
# [topLeft_corner_offset_X, topLeft_corner_offset_Y],
# [botRight_corner_offset_X, botRight_corner_offset_Y]
# ]
#
# here we have our bounds 1.5" horiz offset from top left corner of title block and .5" vert offset.
# bounds = [[1.5",.5"],[5",2.5"]]
#keep in mind that we need in units of our project..in our case imperial is feet so make sure to convert as such..see actual thing below.
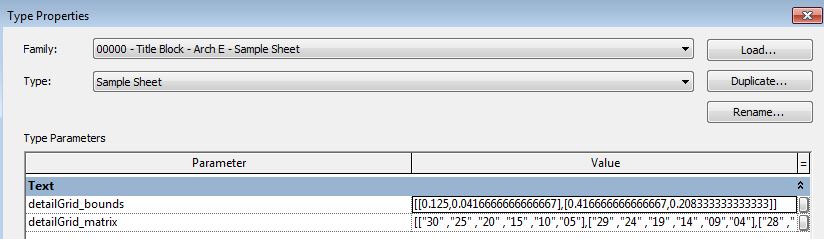
bounds = [[0.125,0.0416666666666667],[0.416666666666667,0.208333333333333]]
Embedding bounds and matrix data in titleblock family
So for these two bits of info above, you have two methods to supply this Information.
1. You can open up the script and edit the hardcoded array (matrix), and hit run. It will then prompt you to click a detail line that represents the bounds on the sheet.
2. [RECOMMENDED] The second way is you can specify two text parameters in your title block to embed this information for you and avoid prompts / detail lines / editing code all together :). Both of these parameters should be devoid of line breaks, and follow the json array format.
Handling duplicates
Nothings perfect..so you might be wondering what if the views coincidentally share the same cell? Well if this happens the script will then look for the next closest cell and try that. If that fails, it will try the next...until finally if there are no more cells available, it will start incrementally increasing from the last cell. Additionally, a message will pop up telling you how many times this duplicate situation happened, as well as highlight that view with a detail line :).
Revit Python Shell vs. Dynamo Python Node
Let's start off with something more or less simple, 2 code snippets. I find that a lot of the times these days I write a lot of python code, usually because of its versatility--it can be used on windows, mac, in rhino, in revit python shell, or dynamo, etc.You can even use it on the web, etc.. BUT lets talk in terms of revit, There are two ways you can use python with the Revit API.
1. Revit Python Shell - The revit python shell, is essentially a downloadable add-in available here. This is more like conventional scripting, and if your used to rhinoscript/python script or any kind of traditional sequential scripting, this is synonymous to having a script written with your favorite text editor and then running it. Essentially you can write scripts, and then run them via buttons/ shortcuts etc.
2. Dynamo Python node - Alternatively, you can run python in a dynamo definition, so if your familiar with grasshopper or visual programming, or if your script is more in need of this type of interface, this is a good bet. plus its native, so no add-in is necessary. This pretty much functions the same way ghPython for grasshopper works. It is a node with customizable inputs and outputs, double clicking into the node, allows you to add your code.
The building coder and proving ground provide a great resource for these two ways of using python. But I found it useful to save this snippet of code to know how to convert between all in the same place. I sometimes start out creating a dynamo graph, and then realize its more useful as a revit python shell script (I.E. in the ribbon as a button or used as a shortcut). OR vice versa. It turns out its not so different in how you set up your base code, which for most api calls, the below set of variables, dependency libraries, etc will be useful. I have converted many scripts to and from dynamo and rps, its super easy!
You can see here a typical RPS script base. Often you will not have to import too many libraries as you will in dynamo. API and APIUI will be enough. Also note the global var __revit__ and __window__. These are not set in the dynamo interface. __revit__ is your access into various revit globals. __window__ is actually a console (text terminal) that appears when you run a script. if you print something, for instance, it should show up here. Generally I close this in my scripts, as it is not how I like to debug, and it is generally not useful unless you are doing so.
Dynamo nodes for python generally take a lot more imports of nodes, especially if your'e affecting the document i.e. transactions.
Two ways of using python with revit
1. Revit Python Shell - The revit python shell, is essentially a downloadable add-in available here. This is more like conventional scripting, and if your used to rhinoscript/python script or any kind of traditional sequential scripting, this is synonymous to having a script written with your favorite text editor and then running it. Essentially you can write scripts, and then run them via buttons/ shortcuts etc.
2. Dynamo Python node - Alternatively, you can run python in a dynamo definition, so if your familiar with grasshopper or visual programming, or if your script is more in need of this type of interface, this is a good bet. plus its native, so no add-in is necessary. This pretty much functions the same way ghPython for grasshopper works. It is a node with customizable inputs and outputs, double clicking into the node, allows you to add your code.
Base Code
The building coder and proving ground provide a great resource for these two ways of using python. But I found it useful to save this snippet of code to know how to convert between all in the same place. I sometimes start out creating a dynamo graph, and then realize its more useful as a revit python shell script (I.E. in the ribbon as a button or used as a shortcut). OR vice versa. It turns out its not so different in how you set up your base code, which for most api calls, the below set of variables, dependency libraries, etc will be useful. I have converted many scripts to and from dynamo and rps, its super easy!
Typical Revit Python Shell Script
You can see here a typical RPS script base. Often you will not have to import too many libraries as you will in dynamo. API and APIUI will be enough. Also note the global var __revit__ and __window__. These are not set in the dynamo interface. __revit__ is your access into various revit globals. __window__ is actually a console (text terminal) that appears when you run a script. if you print something, for instance, it should show up here. Generally I close this in my scripts, as it is not how I like to debug, and it is generally not useful unless you are doing so.
#Typical python revit shell
#===========================


#import routine
#------------------
import clr
clr.AddReference('RevitAPI')
clr.AddReference('RevitAPIUI')
from Autodesk.Revit.DB import *

#important vars, revit python shell version
#-------------------------------
app = __revit__.Application
doc = __revit__.ActiveUIDocument.Document
uidoc = __revit__.ActiveUIDocument
view = doc.ActiveView

#revit python shell has a console, access it like so
#---------------------------------------------------
__window__.Hide()
__window__.Close()
Typical Dynamo Node
Dynamo nodes for python generally take a lot more imports of nodes, especially if your'e affecting the document i.e. transactions.
#Typical dynamo node
#===========================

#import routine
#------------------
import clr
# Import RevitNodes
clr.AddReference("RevitNodes")
import Revit

# Import RevitAPI
clr.AddReference("RevitAPI")
clr.AddReference('RevitAPIUI')
import Autodesk
from Autodesk.Revit.DB import *

# Import Revit elements
from Revit.Elements import *

# Import DocumentManager
clr.AddReference("RevitServices")
import RevitServices
from RevitServices.Persistence import DocumentManager

# important vars, dynamo version
#-------------------------------
doc = DocumentManager.Instance.CurrentDBDocument
uiapp = DocumentManager.Instance.CurrentUIApplication
uidoc = uiapp.ActiveUIDocument
app = uiapp.Application
view = uidoc.ActiveView
